
Are you tired of bare walls in your rental space but worried about damaging the walls with nails? You’re not alone. Many renters face the challenge of wanting to personalize their living spaces without risking their security deposit. Luckily, there are several effective and damage-free methods to hang art and shelves that will allow you to express your style without the need for nails.
In this guide, you will learn how to hang art and shelves using various tools and techniques that won’t leave a trace behind. By the end, your walls will be adorned with beautiful art pieces and functional shelves, transforming your rental into a welcoming haven.
Specifically, you’ll discover the best products to use, step-by-step instructions on how to apply them, and expert tips to ensure your displays look professional. This project is designed for beginners and should take about 1-2 hours to complete. Let’s get started!
TL;DR Summary
- Learn to hang art and shelves in a rental without nails.
- Use damage-free solutions like adhesive strips and hooks.
- Follow step-by-step instructions for best results.
- Get tips on avoiding common mistakes and troubleshooting issues.
TL;DR Summary
Editor’s Choice

Scotch Wall-Safe Tape, 1 Dispenser Roll, Removable Wall Safe Tape, for H…

ZESLMG Adhesive Wall Hooks for Hanging, 16 Pack Self Sticky Hooks Heavy …

15 lb Large Picture Hanging Strips 14 Pairs (28 Strips), Damage-Free Han…
Prerequisites/Materials Needed
- Adhesive Hooks: 4-6, based on weight capacity
- Picture Hanging Strips: 2-4 sets
- Command Strips: 2-4 sets for shelves
- Level: 1 (for ensuring straight placement)
- Measuring Tape: 1
- Pencil: 1
- Cleaning Cloth: 1 (to prep wall surfaces)
Prerequisites/Materials Needed
Editor’s Choice

MOVELYST 28-Pairs(56 Strips) Large Narrow Picture Hanging Strips, Remova…

Command Large Utility Hooks, 7-Hooks, 12-Strips, Organize Damage-Free | …
Command 15 lb Large Picture Hanging Strips 14 Pairs (28 Strips), Damage-…
Skill Level & Time Estimate
Skill Level: beginner
Total time estimate: 1-2 hours
Breaking it down by steps:
- Preparation: 15-20 minutes
- Measuring and marking: 15 minutes
- Applying adhesive: 10-15 minutes
- Hanging art/shelves: 30-60 minutes
Skill Level & Time Estimate
Editor’s Choice

Gorilla Invisible Hold Mounting Tape, 1″ x 150″ (Pack of 1), Clear Doubl…
Step 1: Gather Your Materials
Start by collecting all the materials you need for this project. Having everything on hand will streamline your process and minimize interruptions.
- Find a clean workspace where you can lay out all your materials.
- Check that you have the correct number of adhesive hooks, strips, and other supplies.
- Make sure your measuring tape and level are accessible.
Pro Tip: Organize your materials by type to save time later.
Why this matters: Gathering your materials ensures that you won’t have to stop mid-project to find something, making your work more efficient.
Time estimate: 15-20 minutes.
Step 1: Gather Your Materials
Editor’s Choice
Command Large Utility Hooks, 7-Hooks, 12-Strips, Organize Damage-Free | …
15 lb Large Picture Hanging Strips 14 Pairs (28 Strips), Damage-Free Han…

Elitech Laser Measure 165ft, Digital Laser Tape Measure for Home Decor &…
Step 2: Prepare the Wall Surface
Before you start hanging anything, it’s essential to prepare the wall surface. This ensures that the adhesive will stick properly and last longer.
- Use the cleaning cloth to wipe down the areas where you plan to hang art or shelves.
- Remove any dust, dirt, or grease that could interfere with adhesion.
- Allow the wall to dry completely before proceeding.
Warning: Ensure the surface is clean and dry, as moisture can weaken adhesive strength.
Why this matters: A well-prepped surface guarantees that the adhesive will hold, preventing any accidents later.
Time estimate: 10 minutes.
Step 2: Prepare the Wall Surface
Editor’s Choice
Command Large Utility Hooks, 7-Hooks, 12-Strips, Organize Damage-Free | …

EZlifego Double Sided Tape Heavy Duty, Nano Double Sided Adhesive Tape, …

MR.SIGA Microfiber Cleaning Cloth,Pack of 12,Size:12.6″ x 12.6″
Step 3: Measure and Mark Placement

Now that your wall is prepared, it’s time to measure and mark where you want to place your art and shelves.
- Use the measuring tape to determine the desired height for your items.
- Make light pencil marks on the wall where each piece will hang.
- Double-check your measurements using a level to ensure everything will be straight.
Pro Tip: Consider the scale of your furniture and the space around the art or shelves to avoid overcrowding.
Why this matters: Accurate measurements and markings help in achieving a professional look, making the art and shelves visually appealing.
Time estimate: 15 minutes.
Step 3: Measure and Mark Placement
Editor’s Choice
Command 15 lb Large Picture Hanging Strips 14 Pairs (28 Strips), Damage-…

Picture Hanging System Click Rail Kits,in one Set Included Two of White …
Command Large Utility Hooks, 7-Hooks, 12-Strips, Organize Damage-Free | …
Step 4: Apply Adhesive Hooks or Strips
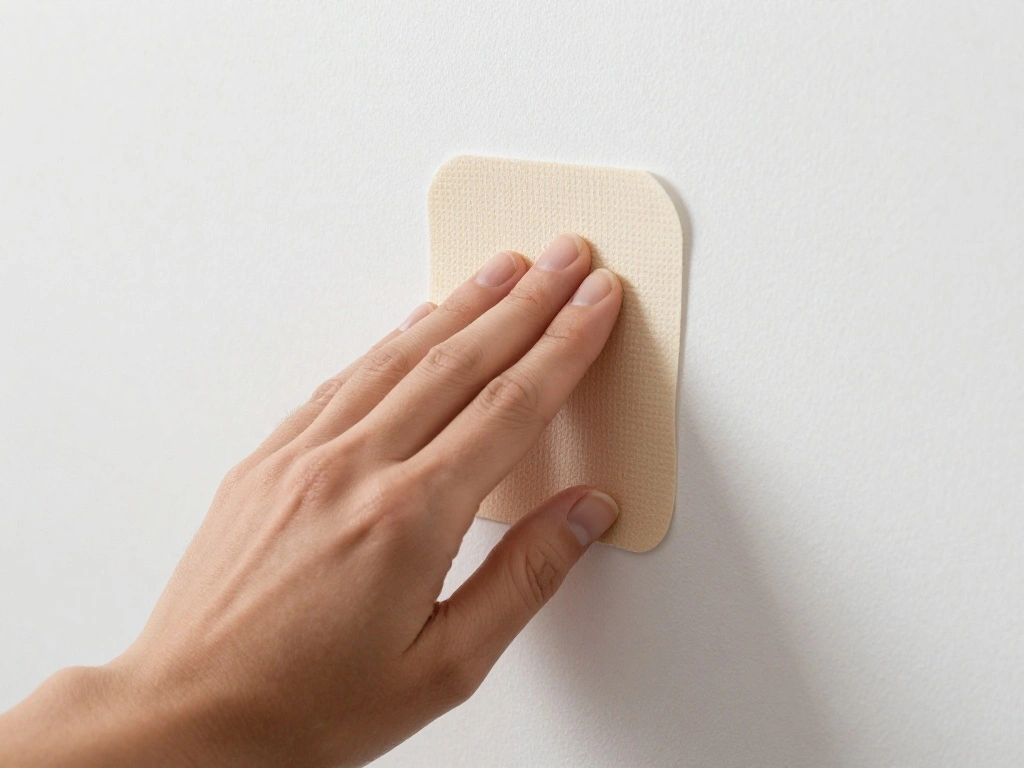
Once you have marked your spots, it’s time to apply the adhesive hooks or strips to the wall.
- Peel off the backing from the adhesive strip or hook.
- Align the hook or strip with your pencil marks and press firmly against the wall.
- Hold in place for about 30 seconds to ensure a strong bond.
Warning: Do not hang anything immediately after applying; allow the adhesive to set as per product instructions.
Why this matters: Proper application of the adhesive ensures that your art and shelves will remain secure and not fall.
Time estimate: 10-15 minutes.
Step 4: Apply Adhesive Hooks or Strips
Editor’s Choice

VELCRO Brand Heavy Duty Fasteners | 4×2 Inch Strips with Adhesive 8 Sets…
15 lb Large Picture Hanging Strips 14 Pairs (28 Strips), Damage-Free Han…
Large Utility Hooks, 7-Hooks, 12-Strips, Organize Damage-Free | 12-Strips
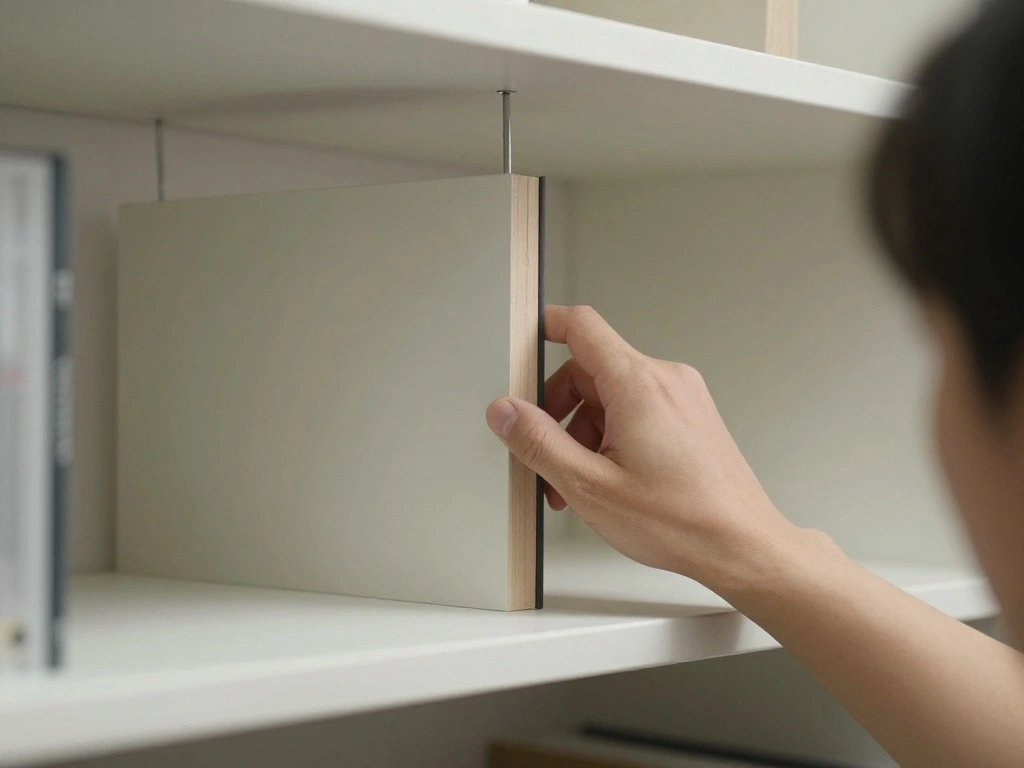
Step 5: Hang Art or Shelves
Now that your hooks or strips are in place, you can begin hanging your art and shelves.
- For art, simply hang it on the adhesive hooks according to the product instructions.
- If using shelves, attach the shelf to the mounted strips, ensuring it is level.
- Step back and visually check if everything looks straight and balanced.
Pro Tip: Use a level for final adjustments to ensure your art and shelves are perfectly aligned.
Why this matters: Properly hung items enhance the aesthetic of your space and make it feel more like home.
Time estimate: 30-60 minutes.
Step 5: Hang Art or Shelves
Editor’s Choice
ZESLMG Adhesive Wall Hooks for Hanging, 16 Pack Self Sticky Hooks Heavy …

Frienda 100 Pcs Decorative Gondola Shelving Vinyl Insert Strips Pre Cut …

Torpedo Level Magnetic, Firecore 9 Inch Shockproof Small Leveler Tool wi…
Step 6: Allow to Set and Test Stability
After hanging your art and shelves, it’s essential to allow the adhesive to set and test their stability.
- Wait at least 30 minutes to an hour for the adhesive to bond effectively.
- Gently test the stability by lightly tugging on each piece to ensure it’s secure.
- If anything feels loose, reapply the adhesive or adjust as needed.
Warning: Do not overload your shelves right away; give the adhesive time to work properly.
Why this matters: Ensuring stability reduces the risk of damage to your walls and keeps your belongings safe.
Time estimate: 15 minutes.
Step 6: Allow to Set and Test Stability
Editor’s Choice
Command 15 lb Large Picture Hanging Strips 14 Pairs (28 Strips), Damage-…
ZESLMG Adhesive Wall Hooks for Hanging, 16 Pack Self Sticky Hooks Heavy …
Step 7: Enjoy Your New Decor!
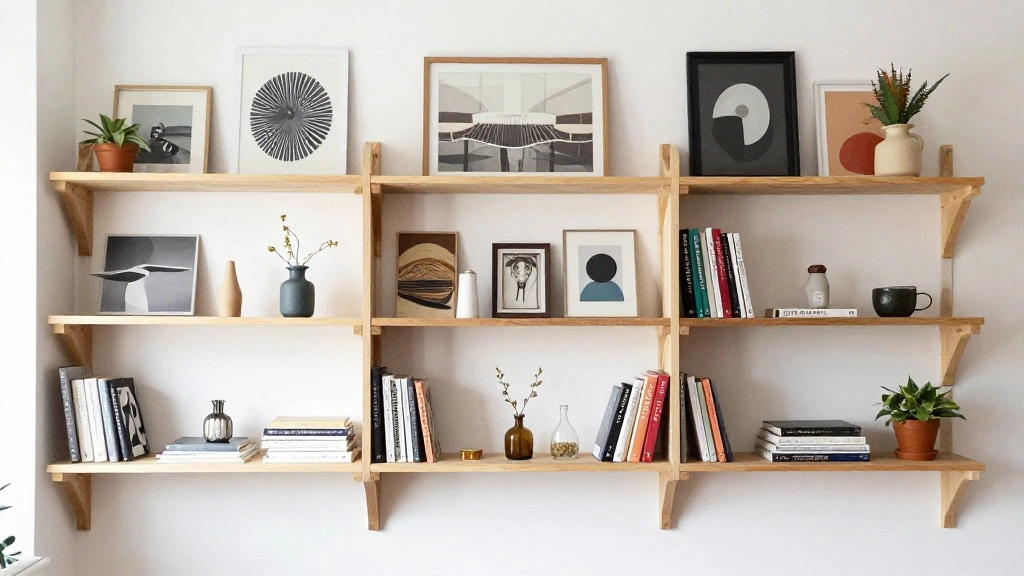
Congratulations! You’ve successfully hung art and shelves in your rental without using nails. Now it’s time to enjoy your new decor.
- Take a moment to admire your work and appreciate the personal touch you’ve added to your space.
- Consider rearranging or adding more items over time to keep your decor fresh.
- Share your transformation on social media or with friends for inspiration!
Pro Tip: Regularly check the stability of hung items and adjust as necessary.
Why this matters: Celebrating your achievements boosts your confidence and encourages you to continue personalizing your space.
Time estimate: 5 minutes.
Step 7: Enjoy Your New Decor!
Editor’s Choice
Command 15 lb Large Picture Hanging Strips 14 Pairs (28 Strips), Damage-…
Command 15 lb Large Picture Hanging Strips 14 Pairs (28 Strips), Damage-…
Pro Tips
- Consider Weight Limits: Check the weight limits on adhesive products to avoid accidents.
- Use Command Strips for Frames: They offer a damage-free solution for hanging frames without hooks.
- Plan Your Layout: Lay out your art and shelves on the floor before hanging to visualize the arrangement.
- Mix and Match: Use various sizes and styles of art to create an engaging gallery wall.
- Seasonal Changes: Change up your decor to keep your space feeling fresh without damaging your walls.
Pro Tips
Editor’s Choice

Command 20 lb XL 8 Pairs Heavyweight Picture Hanging Strips (16 Strips),…
ZESLMG Adhesive Wall Hooks for Hanging, 16 Pack Self Sticky Hooks Heavy …
Picture Hanging System Click Rail Kits,in one Set Included Two of White …
Common Mistakes to Avoid
Warning: Avoid these common pitfalls to ensure success:
- Not Cleaning the Wall: Failing to clean the surface can lead to poor adhesion. Always prep your wall.
- Overloading Hooks: Hanging items that exceed weight limits can cause damage. Stick to recommended weights.
- Rushing the Process: Don’t skip waiting times for adhesive to set—patience pays off.
Troubleshooting Section
Problem: Art or shelves fell off the wall.
Solution: Check the weight limits of your adhesive products and reapply as needed, ensuring the surface is clean.
Problem: Adhesive strips won’t stick.
Solution: Clean the wall thoroughly and allow it to dry completely before reapplying.
Problem: Items aren’t level.
Solution: Use a level tool to adjust the positioning of your items for a straight appearance.
Troubleshooting Section
Editor’s Choice
Command Large Utility Hooks, 7-Hooks, 12-Strips, Organize Damage-Free | …
Torpedo Level Magnetic, Firecore 9 Inch Shockproof Small Leveler Tool wi…

Wenqik 45 Pcs Adhesive Picture Hanger Foamboard Picture Hanging Hooks Wi…
Variations/Alternative Methods
Consider these variations for hanging art and shelves:
- Magnetic Paint: Create a magnetic wall for easy art changes, ideal for renters wanting flexibility.
- Wall Tapestries: Use fabric or tapestries as wall decor, which can be hung using adhesive hooks.
- Lean Shelves: Instead of hanging, consider leaning shelves against the wall for a trendy look.
Variations/Alternative Methods
Editor’s Choice

Magnetic Paint & Primer (Water Based) – Standard Yield 32oz, MISTD-1530

104Pcs Shelf Pins Kit,4 Styles Nickel Plated Shelf Support Pegs,Bookshel…
Command Large Utility Hooks, 7-Hooks, 12-Strips, Organize Damage-Free | …
FAQs
- What if I don’t have adhesive hooks? You can use adhesive strips or even removable putty as alternatives.
- How long should I wait before hanging items? It’s best to wait at least 30 minutes to an hour for the adhesive to set properly.
- Is it safe to use adhesive for heavy items? Always check the weight limits on the adhesive products to ensure safety.
FAQs
Editor’s Choice
Command Large Utility Hooks, 7-Hooks, 12-Strips, Organize Damage-Free | …

Mounting Putty 3MVK, Removable, 2 oz, White, 3-Pack
Command 15 lb Large Picture Hanging Strips 14 Pairs (28 Strips), Damage-…
Conclusion
You did it! Your rental is now a reflection of your personal style without risking your security deposit. Enjoy the transformation of your space and the satisfaction of having completed this project.
As you continue to personalize your living area, consider exploring other decor projects that require no damage to your walls. Share your journey with friends or on social media to inspire others!